
We strongly recommend for any installation, bench testing the components first, connecting cables and configuring the connection before stringing the cables or drilling holes. This will allow you to more easily confirm operation, field of view etc. at the start of the project.
Update your SIMRAD firmware to the latest version.
We recently worked with SIMRAD to have "NIGHTWAVE DIGITAL" be discoverable by the ONVIF Scan feature in the SIMRAD’s Camera Menu.
On the SIMRAD - Make sure both of these settings are checked ON.
NOTE: you may need to turn these ON for every MFD on your vessel, so check each display.
Settings Gear (top left) > System > Advanced…> Features > Video (may show up as IP Camera)
-Show Video icon
-Allow IP Cameras
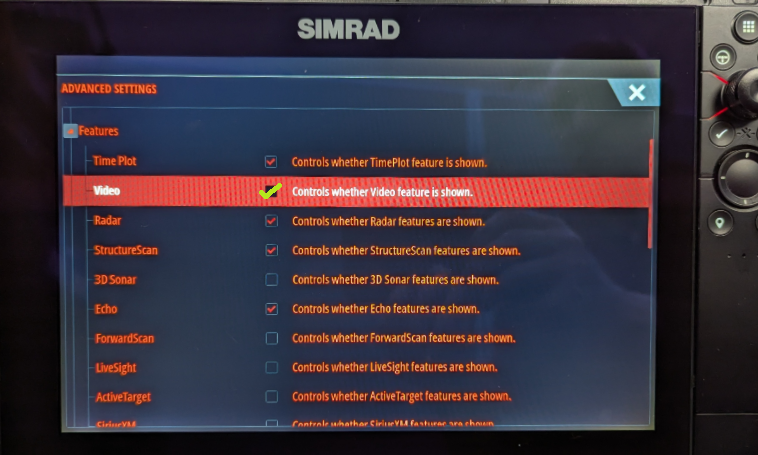 | 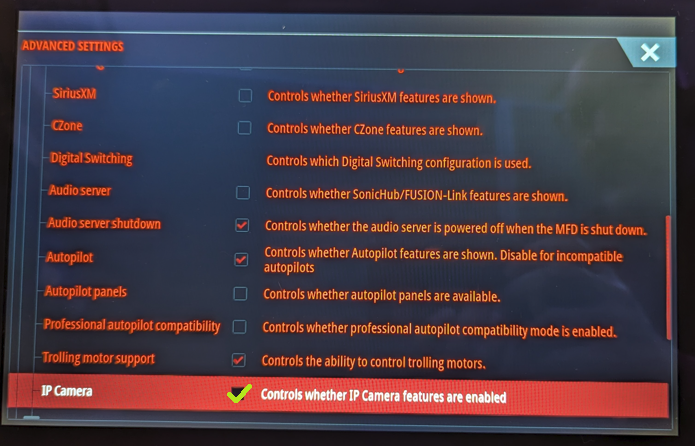 |
When you have connected and powered up the Nightwave Digital, you will see a purple LED above the lens when it is booting up, and then a solid red LED when it is ready.
When you have a solid red LED on the Nightwave, a SIONYX Tool Panel icon will appear on the MFD main screen. This Tool Panel is to adjust some camera settings and find information, but it is NOT where you go to see the live view. Instead you go to the Camera/Video Icon on the SIMRAD to find the live view.
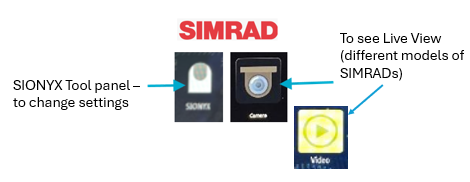
Within the SIONYX Tool Panel - Change the Resolution to 640 x 512
This aspect ratio matches many SIMRAD models
Under Video streams, or a tab at the bottom that looks like a camera. Look for “Size” and use the orange arrows to change the resolution to 640 x 512 (an aspect ratio of 5:4)
Then power cycle the SIMRAD/s, then the camera by cycling the power switch to the PoE Injector.
The Simrad should reboot before rebooting the camera to enable normal address negotiation between the two devices.
Configure the camera within the Simrad - manually or by scanning
(Depending on the firmware version of the SIMRAD, it may automatically find “NIGHTWAVE DIGITAL” as a Camera Source).
On the Simrad main page, Go to Settings Gear (top left icon) / Cameras / Click ONVIF scan / Click “NIGHTWAVE DIGITAL” / Click Connect / click Add
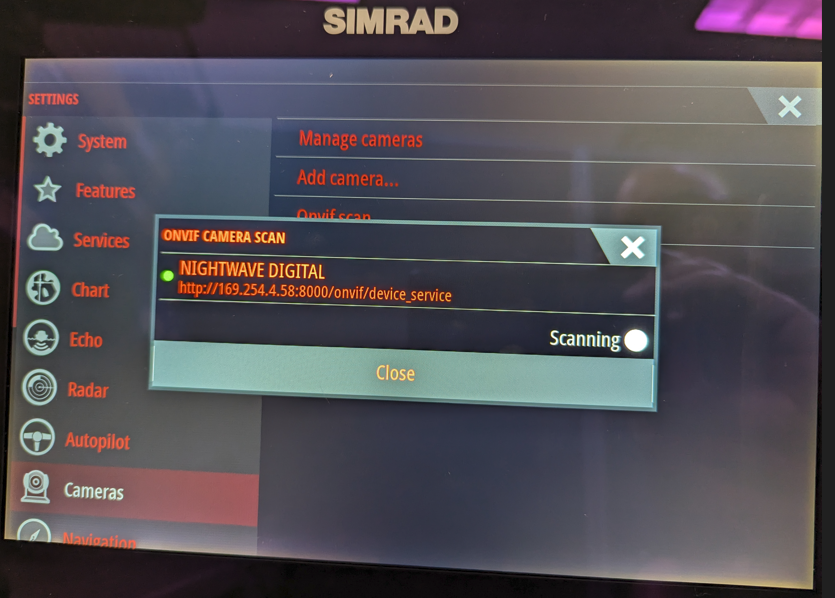
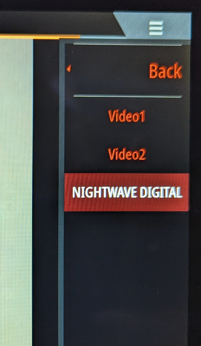
Then go back out to the main screen and click on the Video icon / Open the side menu / View Sources /
select NIGHTWAVE DIGITAL video source.
If Onvif scan did not work as described or if you do not see Nightwave Digital listed as a video source then you can manually add the details of the RTSP stream into the SIRMAD system.
Go into Settings / Cameras / Manage Cameras and delete all previous video sources.
----------------- To Manually Add an RTSP stream address ------------------------
Go back out to the main screen, and access the SIONYX Tool-panel
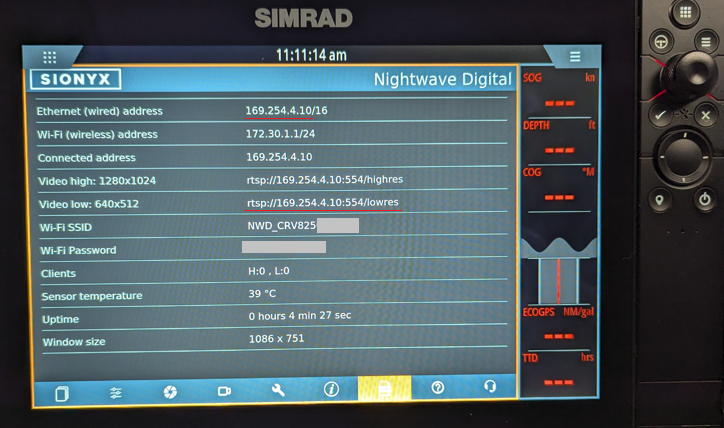
On the Information ("i") or Log pages
Find the Wired Ethernet address (x.x.x.x)
This is the four numbers separated by periods - ignore the network size indication ( "/16" in the example below)
or preferably the full address of the lowres RTSP stream - that includes the wired Ethernet address
as shown below.
Take a picture / write this down
Now you will manually configure the camera within the Simrad Manage Cameras dialog
by entering this stream information
Go back out to the main page, Go to Settings Gear (top left icon) / Cameras / Click Add A Camera
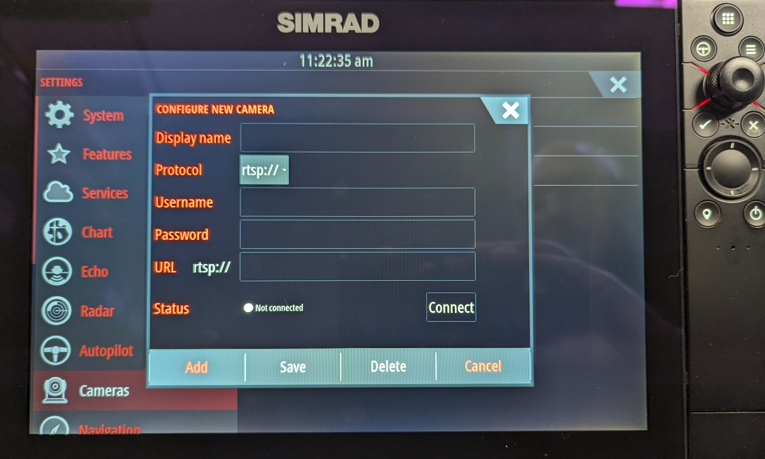
Add in a camera name of your choice
No Username or password is required
URL: Notice if the prefix of "rtsp://" is prefilled
type in the RTSP stream address as recorded from the Sionyx Tool Panel
Use lowercase and enter the address with exactly the correct syntax (shown below)
The IP address on your system will likely differ from the example below
but it will be followed by :554/lowres
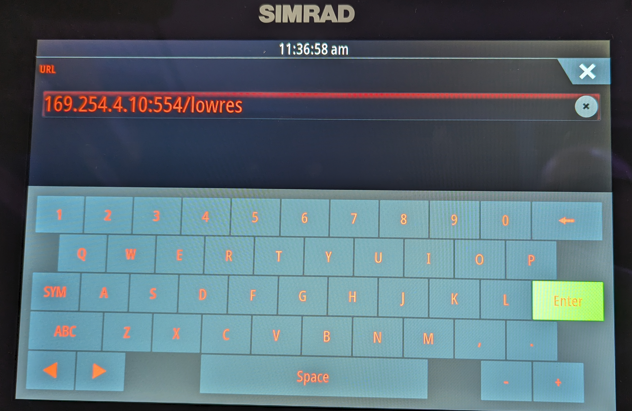
Use lowercase letters. Type in the periods too


Hit Connect first
then Add
then Save
Power cycle the MFD
then power cycle the Nightwave Digital
Wait for the Nightwave to show a solid red light.
From the main page hit the Video icon / Sources / select the name you gave your newly created Nightwave device,
be patient and you should then see live video
If you see "Searching for SIONYX Camera", please wait 30-40 seconds.
Once you are successfully connected and configured, you can then select a different resolution (and aspect ratio) to best match your screen format, from the Sionyx Tool Panel
You will need to reboot the camera to apply a different resolution.